Introduction
This guide details the process for adding wheel articulations and configuring solar panels in a GMDF file for a GLTF model in STK. It also includes instructions on converting various file types to GLTF format using Blender, a free 3D modeling tool used here for preparing and modifying the model for STK use.
Blender supports conversions from multiple formats, including Collada (.dae), Alembic (.abc), Universal Scene Description (usd*), SVG as Grease Pencil, Wavefront (.obj), Stanford PLY (.ply), STL (.stl), Motion Capture (.bvh), Scalable Vector Graphics (.svg), FBX (.fbx), and glTF (.glb/.gltf).
Download Blender for free here.
Step 1: Import and Prepare the Model in Blender
- Import the Model
- Open Blender.
- Go to File → Import and select the model file format.
- Use the file explorer to locate and select the model.
- Locate and Adjust Wheels
- In the Scene Collection window, locate the wheel objects.
- Set each wheel’s origin to geometry:
- Object → Set Origin → Origin to Geometry (or right-click on the object to access this option).
Step 2: Export the Model as GLTF/GLB
- Go to File → Export → glTF 2.0 (.glb/.gltf).
- Save the file in the directory where the GMDF file will be placed.
- Ensure the file is saved as .gltf. If exported as .glb, change the file extension to .gltf for GMDF compatibility.
Step 3: Create the GMDF File for Articulations and Solar Panels
- Open a text editor and create a GMDF file with the following structure for wheel articulations:
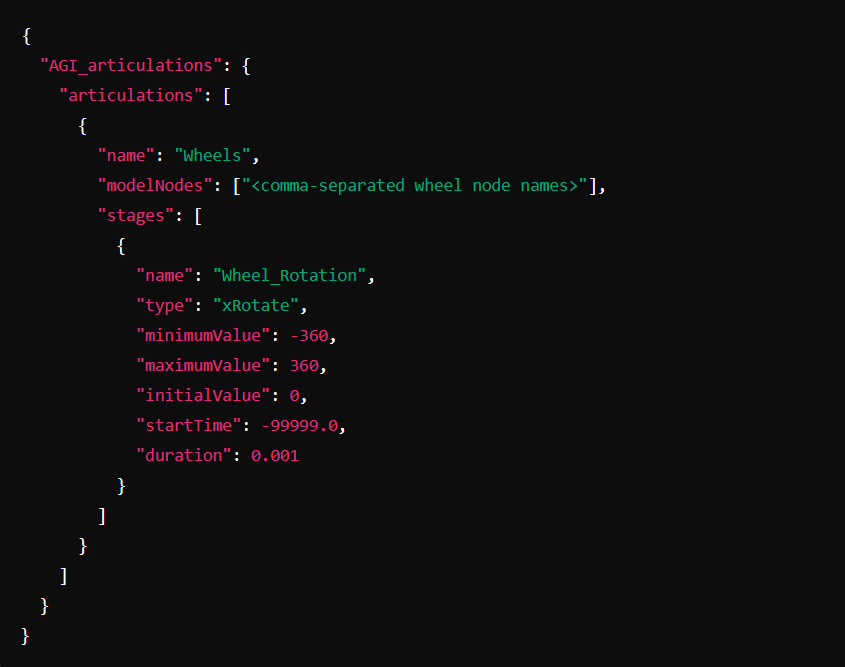
- Ensure that the modelNodes list matches the wheel names in Blender and name the GMDF file to match the .gltf file (e.g., RoverModel.gltf and RoverModel.gmdf). Both files should be in the same directory.
Step 4: Load the Model and GMDF File in STK
- Place both the GLTF and GMDF files in the same directory.
- Open STK, create a vehicle object (optional: set Central Body to the Moon).
- Under 3D Graphics → Model, load the model.
- Verify articulations in STK by checking Articulations to ensure wheel rotation options appear.
- If not shown, ensure the modelNodes in the GMDF file exactly match the Blender model node names, e.g., ["FL Wheel", "FR Wheel", "ML Wheel", "MR Wheel", "RL Wheel", "RR Wheel"].
Step 5: Visualize Wheel Movement
- In STK, set up waypoints for the vehicle model under Basic → Route using the Great Arc Propagator.
- Open the Movie Timeline:
- Go to Add/Edit Object Timeline → Model Articulations → Wheels/Wheel_Rotation.
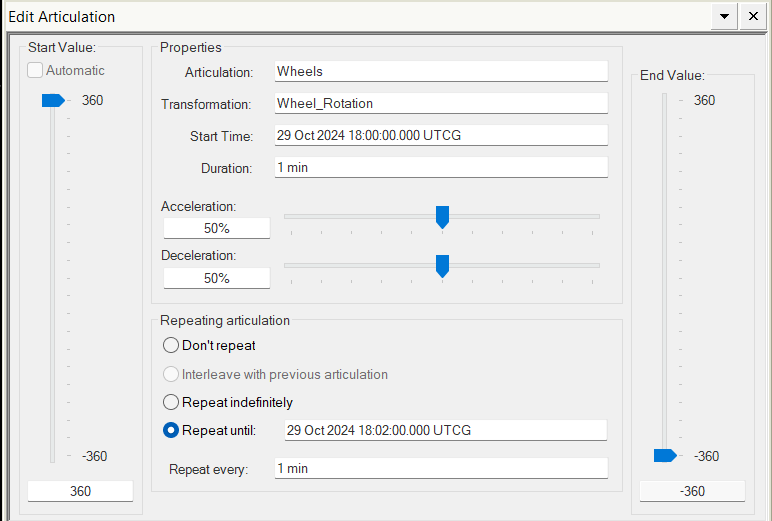
- Click OK, then add a new keyframe and adjust parameters as follows:
- Start Value: 360
- End Value: -360
- Duration: 1 min
- Repeat Every: 1 min
- Select the vehicle and Zoom To to view. Play the animation to see the wheel articulation.
Step 6: Adding Solar Panels to the Vehicle Model
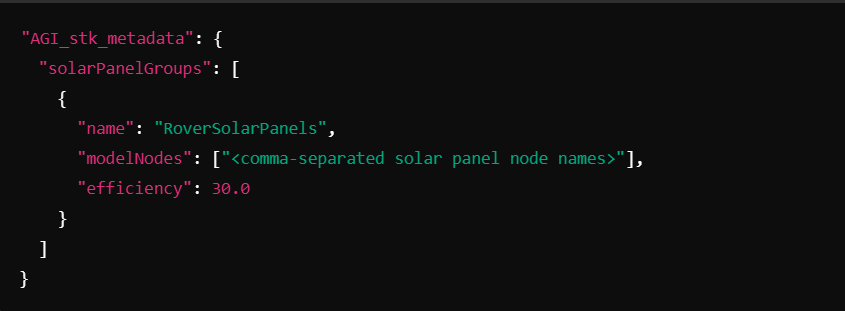
- If your model includes solar panels, add them in the GMDF file under AGI_stk_metadata:
- Use the waypoints from Step 5 for vehicle movement or create a default satellite within STK.
- In the Object Browser, right-click on the vehicle or satellite model and select Solar Panel Tool.
- In the Solar Panel Tool, ensure the solar panel group is shown, compute for the time window, and visualize results.
- If not shown, ensure the modelNodes in the GMDF file exactly match the Blender model node names, e.g., ["Central solar panel cells", "Left solar panel cells", "Rear left solar panel cells", "Rear right solar panel cells", "Rear solar panel cells", "Right solar panel cells"].
Final Notes
- Naming Consistency: Match node names in the GMDF with those in Blender.
- Troubleshooting: Ensure Origin to Geometry and transformations are correct if wheels do not rotate as expected.
- Customization: Adjust solar panel efficiency based on simulation needs.
If you have any further questions or need assistance, we are here to help! Our dedicated Tec-Support team is ready to provide prompt and personalized assistance tailored to your needs. Please don't hesitate to reach out by submitting a ticket by going to https://lsas-tec.freshdesk.com/support/tickets/new. We look forward to assisting you and ensuring a positive experience.
Thanks,
LSAS Tec-Support Team
Was this article helpful?
That’s Great!
Thank you for your feedback
Sorry! We couldn't be helpful
Thank you for your feedback
Feedback sent
We appreciate your effort and will try to fix the article